Sub Routing in Vue-Router 2.0

Sub pages appear in many websites. This article will show how easy it is to make sub pages and navigate to and from them using Vue-Rotuer 2.0.
This tutorial continues from the previous article Navigation between pages in Vue-Router 2.0. In that previous article, a VueJS project has already been setup and shows the building of a navigation menu and two pages. This is the last of the three part series.
If you’ve used Vue-Router 1.x, the sub routing syntax is a little different. But the goal between version 1.x and 2.0 are the same.
The Paging outline
Page1
 - page1Sub1
 - page1Sub2
Page2
The sub pages will be saved in the pages folder since they are page components.
Make page1Sub1.vue
<template>
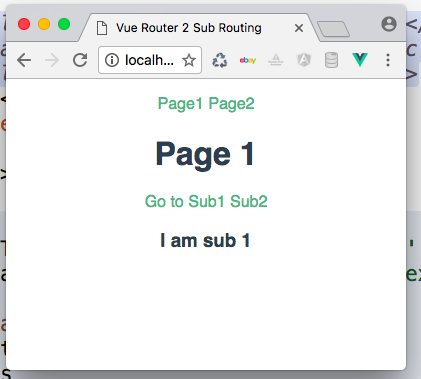
<h3>sub 1</h3>
</template>
<script>export default { }</script>
And make page1Sub2.vue
<template>
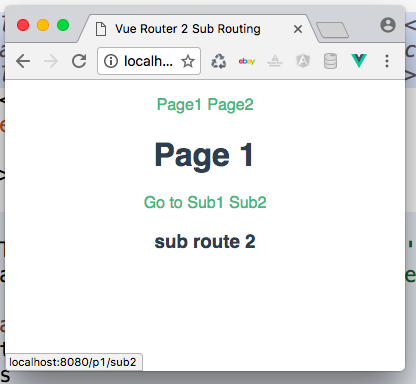
<h3>sub route 2</h3>
</template>
<script>export default { }</script>
Just like regular page components, we need to add these sub pages in the router.js.
/* Page Component imports here */
import Page1 from './pages/Page1';
import Page2 from './pages/Page2';
// include sub page components
import Page1Sub1 from './pages/page1Sub1';
import Page1Sub2 from './pages/page1Sub2';
In the code above, we included the sub page components. But the router configuration doesn’t know what to do with these components. The page1Sub1.vue and page1Sub2.vue can be configured as regular page components or they can be configured as sub pages. The same goes with Page1.vue and Page2.vue. There is nothing different between the page components, especially in this example. Their contents might be different. But in the end, they are just VueJS components.
To make sure that page1Sub1.vue and page1Sub2.vue are intentionally sub pages to Page1.vue, we add them as children in the routes variable.
var routes = [{
  path: '/p1',
  name: 'Page1',
  component: Page1,
  children: [{
    path: 'sub1',
    component: Page1Sub1
  }, {
    path: 'sub2',
    component: Page1Sub2
  }]
} . . .];
The children property is an array. The sub route pages are objects in this array: The sub route syntax is the same as the syntax of the parent page components.
We’re not done yet. We need to add some links to each of the sub pages. We can put a sub route component in the root view. But in this example, Page1 will have the links component. This way, when we navigate to Page2, it will not show the links to the Page1 sub routes.
The Sub Route Links Component
Save this component as SubTabs.vue in the components folder.
<template>
<nav role="navigation">
  <router-link to="/p1/sub1" exact>Go to Sub1</router-link>
  <router-link to="/p1/sub2" exact>Sub2</router-link>
</nav>
</template>

<script></script>
<style></style>
Add this component in Page1.vue
<script>
import SubTabs from '../components/SubTabs';

export default {
   components: {
      SubTabs
   }
}
</script>
Page1.vue‘s <template> looks like App.vue‘s because Page1.vue will have to use <router-view> to render the sub pages.
<template>
<h1>Page </h1>
<sub-tabs></sub-tabs>
<router-view></router-view>
</template>
The Fragment Instance Error (again)
To fix this, we need to have an enclosing <div> to all the contents in Page1.vue.
<template>
<div class="page1">
   <h1>Page 1</h1>
   <sub-tabs></sub-tabs>
   <router-view></router-view>
</div>
</template>
In the browser, we can see the sub route menu if Page1 is visible. We can navigate between page1Sub1 and page1Sub2. We navigate to Page2, we don’t see the sub route navigation. If we navigate back to Page1, we see, again, the sub route navigation. But the sub pages’ contents are not visible, unless we click the link to either sub pages.
To make sure that a sub page appears when its parent page is active, we can set that sub page to appear by default. We can do this by using Vue-Router’s redirection. For this example, we will set page1Sub1 to appear default if Page1 is active.
var routes = [
  . . .,
  {
    path: '*', redirect: '/p1'
  },
  {
    path: '/p1',
    redirect: '/p1/sub1'
  }
];
Back to the browser, if we navigate from Page2 back to Page1, we see page1Sub1’s content appear right away.
If we type localhost:8080, page1Sub1 content appears as default. This is because the router is configured to show Page1 component as default. And, Page1, having the path of /p1, shows page1Sub1. See the code above, and also How to setup Vue-Router 2.0: Basic Setup article.
Ending
This is the third and last part of the three part series about the basics of Vue-Router 2 to make a SPA. The example of this entire project doesn’t have much CSS styling, no realistic data example and the SPA is not as complex as real life ones. But the point of this three part series is to show how fast, easy and straightforward it is to setup Vue-Router 2 while only doing the basics.
I had fun learning VueJS and Vue-Router 2.0. I hope you had fun too.